User’s manual
In this chapter:
The Calendar report
Synchronization of tasks with calendars in other applications
The To Do report
Recording information on task progress
The Results report
The Progress Chart report
Rescheduling a project
Baseline plan
The To Approve report
The Overview database
While the last chapter described activities reserved to project managers, in the present chapter, Task tracking, we will explain how ordinary project team members can use Instant Team in their work.
We will discuss how they can get a general idea of their project activities, how they can hand over information on task progress to project managers, and how project managers can comment on the progress subsequently.
Just like project managers or administrators, users in the Member role can view the Projects database (see Chapter 4, Projects). If they are also listed in the project team they can view the database of notes and attachments to the project and contribute to them.
Additionally, project team members have available the Plans report we described in the previous chapter. Here, they can see a synoptic Gantt chart and detailed schedules of those projects where they are listed in the corresponding teams. As already mentioned above, tasks assigned to them by project managers are highlighted in red.
Missed tasks
Special attention is paid by Instant Team to tasks that have been assigned to a resource of the current user, have not been completed, and where their start date has already passed.
A list of these missed tasks is displayed in a window shown below after a user logs in if they have at least one missed task.

Missed tasks are in two tabs—New and All. The New tab contains the missed tasks that the logged in user has not displayed yet. The All tab contains all missed tasks, even the already viewed ones.
The same list of missed tasks can be retrieved by the user at any time using the View/Missed tasks menu option. The list contains both standard one-time tasks and individual occurrences of recurrent tasks. The missed tasks are normally sorted in descending order according to the To Start column.
Using the Open button you can display the details of a missed task or recurrent task occurrence.
The list of missed tasks can also appear while working with the application. This occurs when a resource is to start working on another task at the given moment. In such a case the window displays new missed tasks, that is, only those missed tasks that the user has not been notified of yet.
The Calendar report
To ensure easier orientation within their upcoming activities, users can use the Calendar report in the Task database (the View/Report/Calendar menu). It shows day by day all tasks scheduled for a given day.
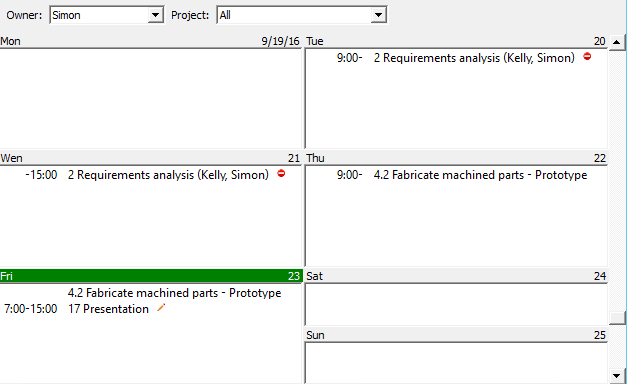
To the right of the calendar, there is a scrollbar which enables you to display the preceding or following period. You can also switch between the displayed days using the <Tab> key (you go to the next day) and the <Shift+Tab> key (you go to the previous day).
Changing calendar zoom
Using the Zoom in button in the Format Toolbar (it is displayed via the View/Format Toolbar menu), you can modify calendar view from weeks to days and, vice versa, using the Zoom out button you can switch to a calendar displaying months or even quarters and years.
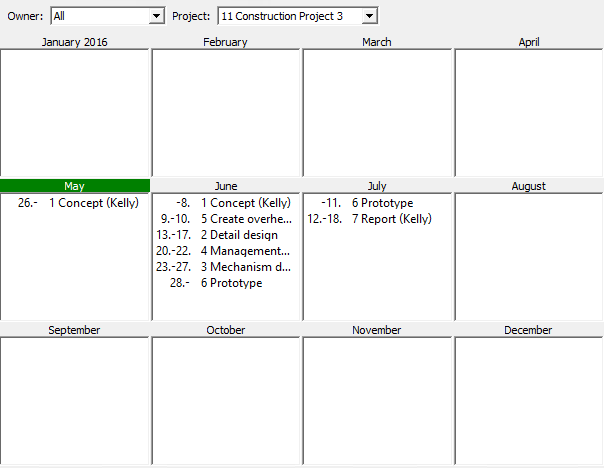
However, neither the quarterly nor yearly calendar show tasks by days and instead they show them by months. The calendars then specify for the individual tasks within a given month on which day work on them should start.
Calendar view parameters
The calendar normally only displays tasks from all projects that are assigned to the logged-in user (a resource of this user is specified as the task owner). It does not even matter whether the user is a project team member or not.
Nevertheless, using report parameters displayed in the toolbar, it is possible to display tasks of any project team member or to restrict the calendar to a single project only. Tasks assigned to resources other than the user’s default resource show the task owner in parenthesis following the name of the task.
Synchronization of tasks with calendars in other applications
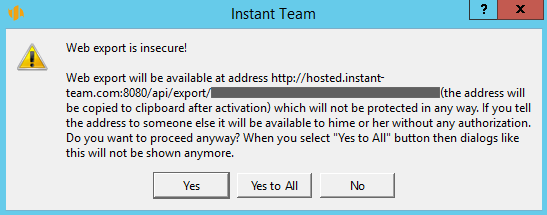
Instant Team enables users not only to see their schedule of tasks in the Calendar report but also to export it in the iCalendar format into the commonly used calendars of other applications or services, such as MS Outlook, Google Calendar, iCal, etc. Via these calendars, you can synchronize your work activities with other devices, such as a tablet or a cell phone. You will thus keep track of your activities even without access to the Instant Team application. You initiate the export by selecting the Record/Export/Activate Web Export of Tasks in iCalendar Format. The outcome of the export will be available at the url address that is saved automatically to the clipboard on your computer (see the figure below) and that you subsequently copy to your regular calendar according to the conventions of the application or service you use. This will enable the calendars to subscribe to Instant Team data and to update them regularly. The procedure of importing tasks from Instant Team into the most often used calendar applications—MS Outlook 2010, Google Calendar, and iCal—is described in Chapter 8.
If you no longer wish to synchronize your tasks you can terminate the export via the Record/Export/Deactivate Web Export of Tasks in iCalendar Format.
The To Do report
If you wish to see the tasks you can work on, then the most suitable report for you is “To Do”. It shows all necessary information regarding tasks assigned to a specific owner, primarily to you.

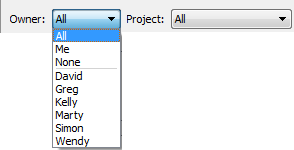
By selecting from the Project parameter menu on the formatting toolbar, you can display tasks from the individual projects. In addition to your own tasks, the report can show you the tasks of other owners to be specified as a parameter in the Owner pull-down menu. To display your own tasks again, select the Me value in the pull-down menu.
Another parameter you can select in the Format Toolbar is the Ready parameter. This parameter can take three values: is Yes, is No, any value. The default option “is Yes” means that the report will contain only tasks on which you can start working because either they have no predecessors or all their predecessor tasks have already been completed. Vice versa, the “Ready: is No” option enables you to display tasks with predecessors for which work is either still in progress or it has not even begun yet. The option is available in this report namely because non-completion of a predecessor can be only illusory. The task may have been completed already but it has not been registered in the system so far. Therefore, the system also enables you to process tasks that do not seem to be ready. And finally, the “Ready: any value” option displays all tasks regardless of their readiness.
The To Do report further provides all substantial information about your tasks or possibly tasks of another owner: task assignment, task effort estimate, completion percentage, and the scheduled period. Moreover, there are fields here where you can record progress on these tasks.
Recording information on task progress
To do this, you use the Results, Remaining, % Done, Initiated, and Status columns in the To Do report. The same fields are also on the Results tab in the individual tasks’ windows.
The current task progress as well as the closing comments on its completion can be entered into the Results text field.
If you have not completed a task yet but you have already accomplished something you can try and estimate the remaining effort of the task and enter it in the Remaining field.
After you modify the value in the Remaining field, the value of the % Done field is calculated automatically. It expresses the ratio of the work currently remaining to be performed on a task to the original effort estimate. Thus, if the original effort estimate for a task (the Planned field in the Plan report or in the task window) was 3 days, you have worked on it for some time, and you think that there is one more day of work yet—and enter this into the system—then the % Done field shows the value 66%.
However, you can also proceed the other way around, that is, enter the value of the % Done field and the system calculates the remaining effort of the task on its own.
The Initiated field registers the actual time when work on the task began. The value in this field is entered automatically if the completion percentage in the % Done field changes or if time already spent on the task is added to it using the Timer. It can also be set to a required date directly in the report. If the value in the Initiated field has not been entered and the task is marked as completed then the time to complete the task is entered automatically.
As already mentioned, you can also enter the same information on task progress in the Results tab in task window. In addition to the two fields described above, the tab offers you two more fields meant to enter information on task progress—the Completed and Completed on fields.
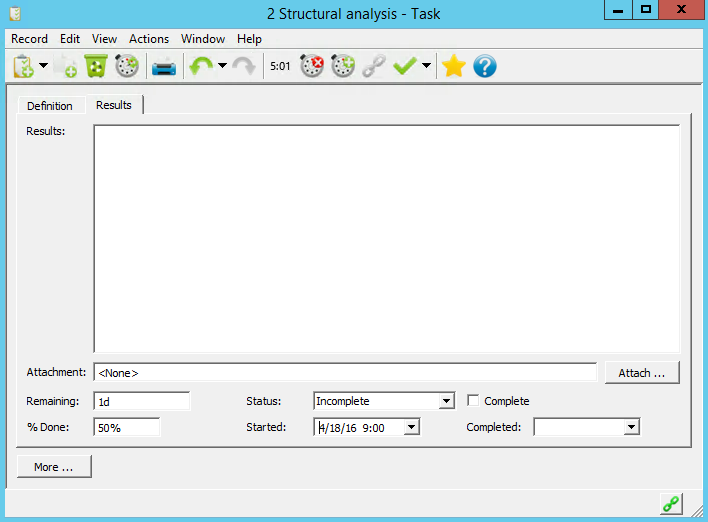
When you finish a task you can mark it as completed, using the "Mark as Completed" option in the toolbar or checking the Completed field. The value in the Completed on field is automatically set to the current date and time (that is, to the moment you finished the task and checked the Completed box). If, however, you register the completion of a task retroactively and the expected end date of the task registered in the system is earlier than today as you check the Complete field then the completion time will be set to the expected end time of the task. Yet, you can also set another completion date and do so directly in the Completed field. By entering values into this field for an uncompleted task, it is automatically marked as completed.
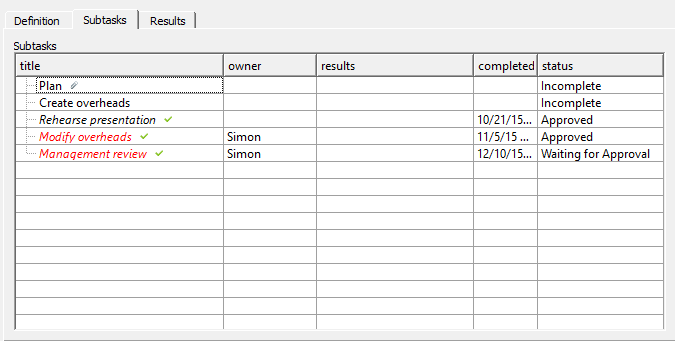
A summary task can be marked as completed if all its subtasks are finished. For simpler registering, use the Subtasks tab in the summary task window, which offers the Results, Completed on, and Status fields for the individual subtasks.
Status of a task changes to the value “Waiting for Approval” after you mark the task as completed. This field can only be changed by users in the Manager role, which we will explain in more detail at the end of the present chapter.
Therefore, if one of team members is not sitting in front of the computer at the very moment or cannot record task progress for another reason then project manager can do it instead. Project manager can also modify data entered by task owners if the manager does not agree with it.
The Results report
As already mentioned above, completed tasks are removed from the To Do report. They are even removed from the Tasks report and from the Calendar. This is because all these reports only show incomplete tasks. To view completed tasks, use the Results report.
It has a structure similar to the Tasks report. It includes tasks from all projects you can access regardless of their owner. The tasks are grouped by projects. However, Gantt chart is absent here and the displayed columns are also different.
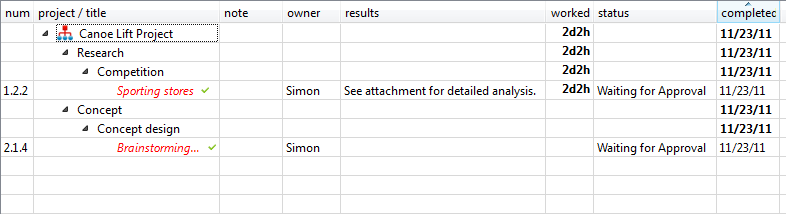
You also notice that completed tasks are set apart in a distinct graphical way. Their names are displayed in italics and also followed by the check icon. Finished tasks are thus symbolically “ticked off”.
The Progress Chart report
Project managers can track project progress even more comfortably—in the Progress Chart report, which is meant exactly for them.
They can see a bar chart here telling them how effort estimate evolved in time for tasks that remain to be completed within projects managed by them. Positive values represent completed tasks or tasks for which the effort estimate was reduced. Negative values, on the other hand, represent newly scheduled tasks and, conversely, those for which the effort estimate was increased.
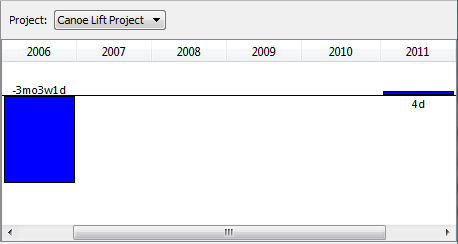
Thus the period when the project is being scheduled mostly begins with strong negative progress because new tasks arise and their original labor intensities are estimated. During the course of the project, progress should be positive already and it should correspond to the volume of resources involved in the project. The Progress report is exactly the one that will indicate to the project manager whether this really is the case.
Similarly to the Utilization report, it is possible to change the zoom as well as the Value Line section shown.
Progress can be analyzed for the individual projects in this report but also in detail for the individual tasks in the Progress Breakdown report. This report also shows the original effort estimates (the Planned column), the total sum of timesheets (the Worked column), the completion percentage (the % Done column), estimates of the remaining work (the Remaining column), and the actual time when work on the task began and ended (the Initiated and Completed on columns) for tasks and cumulatively for projects.
Rescheduling a project
As soon as a task is completed before or, conversely, later than scheduled or if its effort estimate is changed, the original schedule becomes outdated and it must be rescheduled. This is mostly a rather unpopular and very strenuous activity performed by project managers.
However, Instant Team is able to save you most of this work.
Modifying the projected task completion based on a change of the effort estimate
If the effort estimate of a task changes then also the scheduled task completion date is automatically changed accordingly. Of course, if the estimate is reduced this will set an earlier date and if the estimate is increased then this sets a later date. A natural prerequisite is that the estimate changes by a substantial amount otherwise the scheduled completion date remains the same.
The procedure described above applies to both manually and automatically scheduled tasks. The only exception are manually scheduled tasks that were to begin already according to the schedule. Their scheduled completion dates do not shift when their effort estimates are reduced and their scheduled start dates are postponed instead.
Modifying the projected start date for an automatically scheduled and predecessor-scheduled task in case of a schedule change or completion of its predecessor
A much more substantial reduction of work only concerns automatically scheduled or predecessor scheduled tasks. These are automatically rescheduled with every change in schedule of any of their predecessors. The same applies also to automatically scheduled tasks in case of a change in schedule of the preceding automatically scheduled task with the same owner and a change in the capacity reserved for manually scheduled tasks.
In short, automatically scheduled tasks and predecessor scheduled tasks are trying to keep an up-to-date schedule at every moment.
The advantage is that, in fact, the project plan thus remains up-to-date all the time and not only, perhaps, once a week or even once a month when the project manager reserves time for manual rescheduling.
Baseline plan
During the course of the project the current schedule can differ significantly from the original schedule. To analyze situations like that (to compare the current project plan with the status of the project plan at any time in the past), you can use the Baseline Schedule report.
It enables you to compare the current project plan with the status of the project plan at any time in the past. This is because you can save the project plan status at any time; specifically, you can save the projected start and end times of the individual tasks, the effort and costs required by the project (these are stored in the Saved Start Time, Saved End Time, Saved Effort, and Saved Costs fields).
Baseline plans are saved in the project window using the Save Baseline Plan toolbar button or the Record/Save Baseline Plan menu. The saving procedure always applies to the entire project.
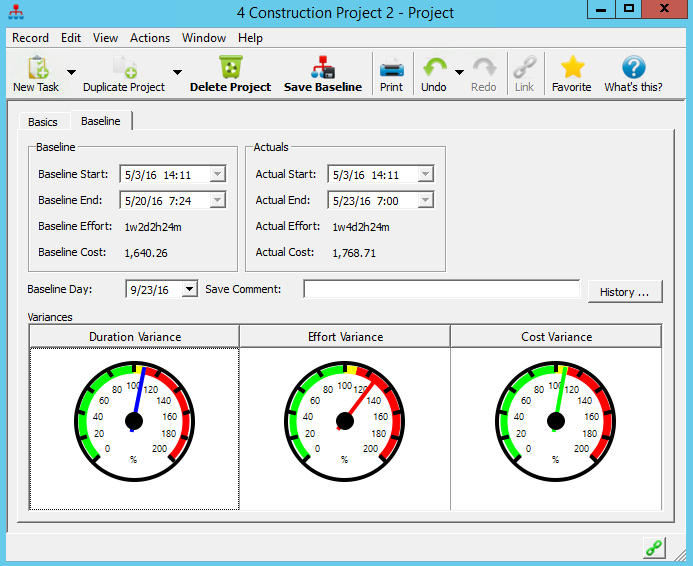
The comparison of the current project plan with a saved baseline plan can be displayed in the project window in the Baseline Plan tab. The window also displays divergences in time, effort, and costs. These values are calculated as a ratio of the anticipated total duration, effort or costs required by the project as opposed to the stored values. Divergences are displayed in the project window in the form of gauges.
The Projects and Tasks databases then involve two Baseline Plan reports where you will see a comparison between the current project plan or plans and the baseline plan.
The Baseline Plan report in the Projects database provides a summary of divergences for all projects together.
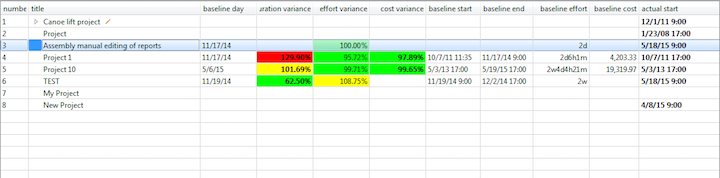
If you wish to have a look at which particular task is causing a divergence from the project baseline plan you can use the Baseline plan report in the Tasks database.
The left part of the report provides the values of Time Divergence, Effort Divergence, and Costs Divergence. The displayed aberrations are color coded to distinguish whether the current expectations are better than the saved plan (in green), within a 10% deviation (in yellow) or above this deviation (in red).
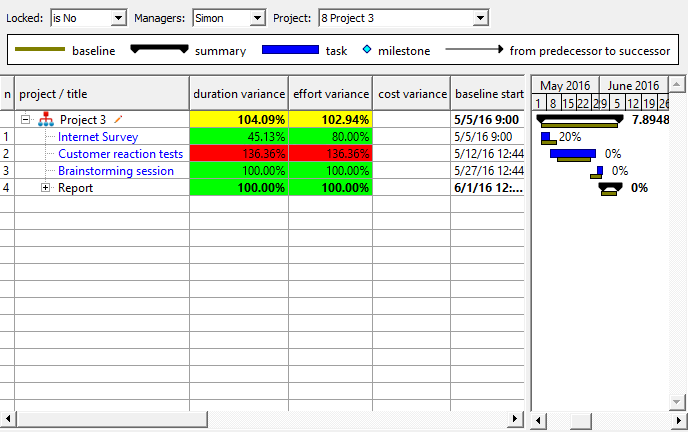
The right part of the report then displays both the actual status and the baseline plan in the form of a Gantt chart. In addition to the ordinary graphics items, we also have here green-brown rectangles representing the baseline plan and captions with the completion percentage of the individual tasks.
The actual time that work on a task started is considered to be the value in the Initiated field; if it is empty then the value of the To Start field is adopted. The actual time that work on a task was finished is considered to be the value in the Completed field; if it is empty then the value of the To End field is adopted. Therefore, for completed tasks, the Initiated and Completed fields are considered to contain the actual values; for uninitiated tasks, it is the To Start and To End fields, and for initiated but not yet completed tasks, it is the value in the Initiated and To End fields.
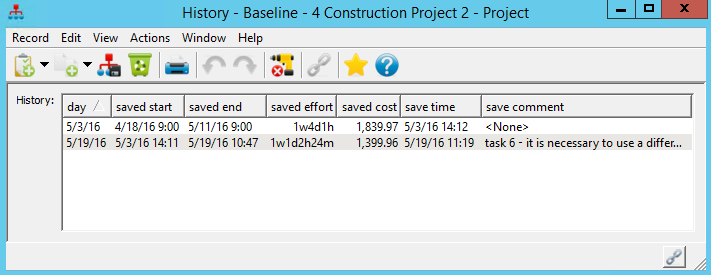
The History project sub-window
You can see the history of saved baseline plans in a window that opens using the History… button in the Baseline Plan tab in project window. You can see here how the saved project plan evolved in time.
The To Approve report
As we have already mentioned above, in case of tasks marked as completed, their statuses change from the value Incomplete to the value Waiting for Approval. Project manager can then view tasks designated to be approved in their To Approve report.
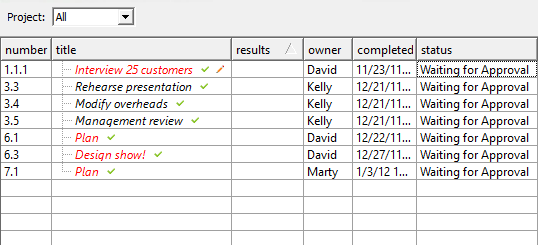
This report shows the tasks to be approved from all projects managed by the user or else the manager can restrict the report to only a single project thanks to the Project parameter in the Format Toolbar. The manager can also see here task result notes (attached to tasks by their owners), task completion dates, and task owners.
The project manager then approves the task by changing its status from Waiting for Approval to Approved. However, they can also choose from other possible statuses:
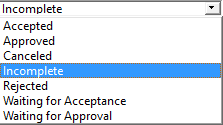
It is appropriate to set the Rejected status in the event that the project manager disagrees with the task marked as completed. The task then reappears among incomplete tasks and it will be apparent from the To Do report that this is a rejected task. In this case it is also appropriate to write an explanation of the rejection in the Results field or else let the owner know about the reason for the rejection in some other way.
You will use the Canceled status in the event that it is no longer necessary to work on the task but it has not been completed. Only the need to perform it has been reevaluated. Of course, an alternative is to delete the task completely but by setting its status to Canceled, you achieve a similar effect and such a task remains in the system so you can trace it back later on.
The Incomplete status is the default task status. Nevertheless, we do not advise project managers to reset tasks to this status because then the owner does not distinguish the tasks that they already submitted but that have not been accepted from the tasks they have not delivered yet.
Locking tasks
Setting the status of a task has the most crucial effect on task owners’ access rights to these tasks. This is because tasks with the Canceled or Complete status cannot be changed by the task owner any more and can only be modified by a project manager.
By approving a task, the task becomes locked which prevents any retrospective manipulation with it.
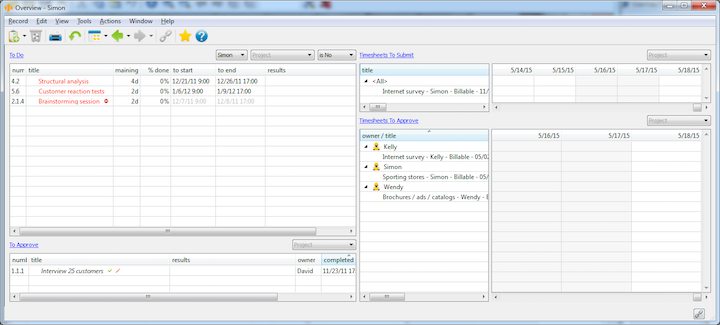
The Overview database
All substantial information concerning the current state of tasks and timesheets of the logged in user can be obtained from the Overview database. It is basically a group of four reports showing in one window both task information and the corresponding timesheet information.
60 days overview of all dates, capacities, inputs and outputs about each project and completely free.
All rights reserved, Created by eBRÁNA Privacy statement