User’s manual
In this chapter:
This chapter deals with customizing property windows containing details of individual records, which is available under the Professional license only. Only a user with the role of Administrator can modify field definition (with the exception of graphic presentation), create new fields, and delete existing ones.
The principles of customizing detailed properties of a record are similar to those of customizing a dashboard report described above. In principle, two aspects of record presentation can be customized: firstly the record content, that is, what fields should be shown in the record properties window, and secondly the record layout, that is, the arrangement of individual fields in the given record.
You will gradually learn about the two customization aspects and how to share the customization with other users.
Record content
The content of a record are the fields the particular record consists of, that is, the information which can be stored in the record. It is, however, necessary to distinguish between what fields are contained in the record and what fields are shown in the record properties window. This is because some fields may be included in the record but they are hidden and thus not displayed at all in the record window.
Let us take as an example a record in the Tasks database, representing one specific task. The record properties window is divided into separate tabs with selected fields shown in each tab. The task record contains information whether it is critical. However, you cannot find this information in the task record window with the standard settings since this is a hidden field.
List of record fields
You can easily find out which fields are actually included in each record in a selected database—look at workgroup customization via the Edit/Customize… menu. In the workgroup customization window go to the Fields tab and select the database the fields of which you are interested in.

The table of fields shows:
- Field name to be shown in the record window as the caption to the left of the input box itself and as the column header in a table report.
- Help to be displayed to the user with the mouse hovering over the field name either in the record window or in any of the reports.
- Field type determining what data the field contains and what the input box for editing the data actually looks like.
- Information on whether the field stores historic values and, if so, then of what type.
- Position of the field in the record window, that is, the location of the field in a specific tab, column or row; one field can be located at several places including even record windows of other databases; it is also possible that the field is not displayed anywhere.
Modifying field definitions
Except for the field type and its historic value properties, all other field characteristics mentioned above can be modified.
The edit window for the field definition can be opened by double-clicking a row with a particular field or by selecting a row and pressing the Modify… button to the right of the table with the list of fields.
In the first tab of the window you can first alter the title of the field and the description to be displayed as a help text when hovering the mouse over the field name in reports or in the record window.
Additionally, you can enter a name for the given field here, to be used when exporting it in the iCalendar format. You need to define the name in such a way that it would be understood by other programs using the iCalendar format or, more precisely, so that it would correspond to a "property" name in the iCalendar standard. The system even allows you to export fields that do not have a name corresponding to a "property". In that case it chooses the name X-UNKNOWN-<name of the field>. Fields from databases of appointments and tasks, which can be exported using predefined export formulas from the ICalendar database, have the name filled out already. (For more on how to proceed when exporting data in the iCalendar format, see Chapter 15, Data exports.) The lower part of the window enables you to modify other parameters depending on the field type. For a text field, this can be the width of the input field, for a numerical field, the number of decimal places, etc.

A special case of field you might want to modify is the Status field in the Tasks database. In the first tab of this field’s definition window you can modify and add statuses of completed and uncompleted tasks.
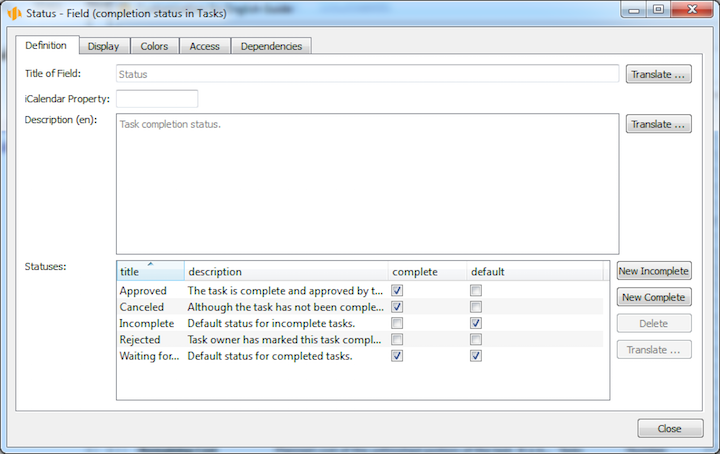
Using the buttons of New Incomplete and New Complete you can add new task statuses. Using the Delete button you can remove selected statuses. You can modify the state name and description directly in the table.
In the second tab of any field definition window you can see where in the record window the field is displayed or in what other databases it is used.
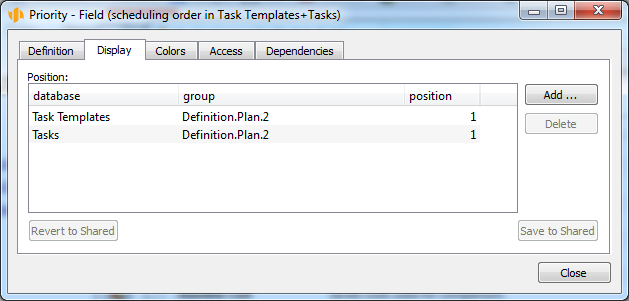
The defined positions can be removed by pressing the Delete button. Use the Add… button to add a new position in the record window where the field should be displayed. You can modify the group and position directly in the table containing the display list. If you are a workgroup administrator, using the Save to shared appearance button you can share your field display settings with other users. By pressing the Reset shared appearance button all your private field display settings will be canceled and the shared settings will be restored. For more information about displaying fields in record windows see the Record Arrangement section below.
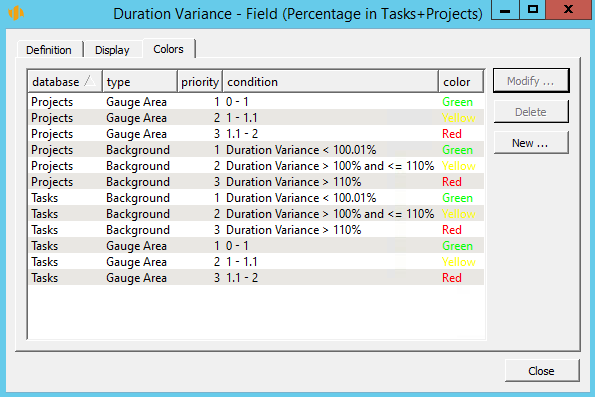
The Colors tab lets you set color codes for records in the fields. A detailed description of how to set the conditions for the records to be displayed in a different color is in Chapter 13, section Color formatting definition.
Creating a new field
There is the New… button to the right of the table with the list of fields which enables you to create your own field. This might be advantageous, for instance, when you want to keep track of some task information that has not been included in the original Instant Team settings.
After pressing the New… button a dialog window for creating a new field is opened. There are three characteristics of the new field to be defined in this window which you will not be able to modify later.
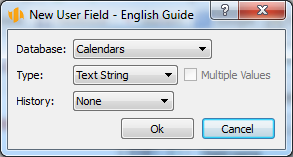
The first of these characteristics is the database in which the new field should be created. The second characteristic is the type of the field to be created which defines what type of data will be stored in the field. One of the following types can be selected:
- Time—a specific date, hour, and minute when an event occurred can be entered in this field.
- Time of day—a specific hour and minute when an event occurred can be entered in this field.
- Timesheet—a link to a Timesheets database record can be entered in this field.
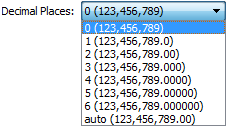
- Number—any numerical data can be stored in this field; in the second
step of the field definition you can then specify the number of decimal
places to be displayed for this field in reports.
- Day—a specific date.
- Duration—a numerical value representing a time period expressed in minutes, hours, days, weeks, months or years (see a detailed description of this value type in Chapter 3, section User Account Administration).
- iCalendar—a link to a Tasks or Appointments database record can be entered in this field.
- Calendar—a link to a Calendar database record can be entered in this field.
- Logical—the values in this field can be yes or no.
- Recurrent activity—a link to a record representing a recurrent task or recurrent appointment can be entered in this field.
- Note/Attachment—a link to a Notes and Attachments database record can be entered in this field.
- Percentage—the percentage type field works similarly to the number type field. The main difference is that the value is followed by the % symbol.
- Project—a link to a Project database record can be entered in this field.
- Appointments—a link to an Appointments database record can be entered in this field.
- Text Area—any text data can be stored in this field.
- Text String—text data of a limited length can be stored in this field; it will also be necessary to specify the width of the input box, that is, the box size corresponding to the number of characters possible to display in the box.
- Task—a link to a Tasks database record can be entered in this field.
- User—a link to any user can be entered in this field.
- Picklist—it will be possible to select the value of this field from a
list of predefined options to be specified in the next step of the field
definition.
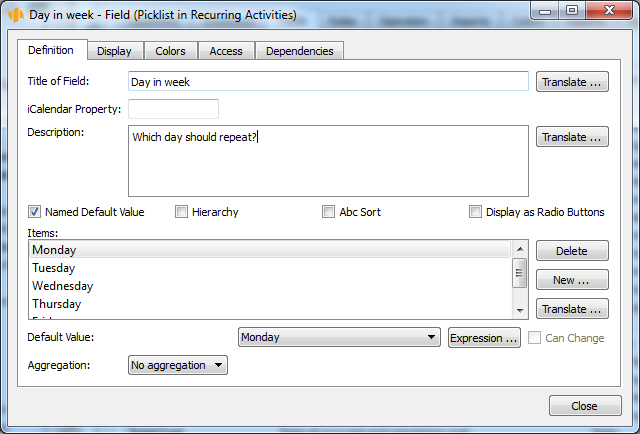
In addition to specifying the selection options (using the New… button), the next step in the definition of a Picklist type field allows you to set these parameters:
- Named Default Value—if this checkbox is ticked, your list will contain a special default value you will be able to name as required. Leaving the checkbox blank, the default value will be None. If you define a default value, the option of None will no longer be available.
- Hierarchy—ticking this checkbox allows the list of options to be organized as a hierarchical structure. You can then create the structure by dragging-and-dropping individual options.
- Abc Sort—if this checkbox is ticked, the options will be sorted in the alphabetical order. If it is blank, you can define the sequence of options manually by dragging them up or down with the mouse.
- Display as Radio Buttons—especially in case of short lists it is more convenient to display the list of options not as a pull-down menu but as radio buttons. Ticking this checkbox makes it possible to display the list in this way.
Names of the items can be modified directly in the table.
- Web Url—a www link will be stored in this field; for this field type, the record will show an arrow and users can navigate to the given web address by clicking the arrow.
- Resource—a link to a Resources database record can be entered in this field.
The third of the characteristics is specification whether the new field should contain historic values, that is, whether information should be stored in the record about what value was stored in the field on a specific day. What options are available depends on the field type selected above. In general, one of the following options can be selected:
- None—only the current value, that is, the last data entered, will be stored in the field.
- Value Since Day—historic values will be stored in the field as they changed in time on each day.
- Value in Period—historic values will be stored in the field as they accrued in time; this option is available for Number and Duration field types only.
After pressing the Ok button, the new field will be created and you will be able to specify the name, description, and other parameters depending on the field type. Proceed as if you were modifying an already existing field—see above.
Copying fields
To the right of the table containing a list of fields, you find the Copy… button that enables you to create a copy of the selected field in a different database. You can only copy user-created fields.
After you press the Copy… button a dialog window pops up where you create a new field. In this case, the window only lets you change the database. The Type, Multiple values, and History fields are pre-completed in accordance with the copied field and you cannot change these values.
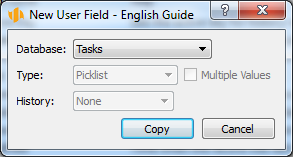
After you press the Copy button a field editing window pops up, see above. Data in the window has been pre-completed with the values of the field used to generate the copy.
After a copy of a field has been created the field exists in two or more databases. If you change a property of the field in one database then the property changes automatically in all copies of the field in other databases as well.
If a table with a list of fields displays fields from all databases then the Database column contains a list of all databases (comma separated) in which there is a copy of the corresponding field.
Deleting fields
Existing user fields which are no longer needed or which were created by mistake can be removed using the Delete button to the right of the list of fields.
A field with a copy in more than one database can only be removed in case the table with a list of fields shows fields from just a single database.
If you deleted a field by mistake, you can recover the deleted user fields using the Undo button.
Record arrangement
The layout of the individual fields in the record window is defined again as part of workgroup customization via the Edit/Customize… option. In the workgroup customization window go to the Databases tab and by double-clicking a database or pressing the Open… button you can open the editing window to design the record properties window of the selected database.
Field arrangement in the record window
This tab includes two lists of the particular database record fields which can be displayed in the record window. The left list contains fields to be displayed in the record window, the right one contains hidden fields—the fields not to be displayed. Fields in the left list are combined into groups, see below.
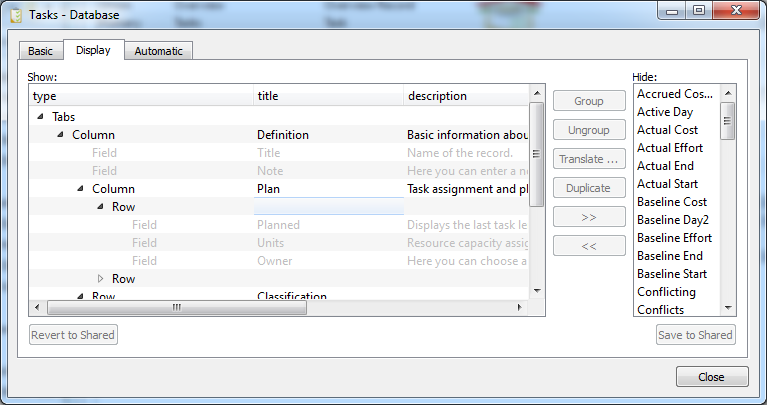
If you want to start displaying any of the currently hidden fields, simply move them to the left list using the button with the left-pointing arrows. The field is inserted into the group that is active in the left list. On the other hand, if you want to stop displaying a field in the record window, move it to the right list using the right-pointing arrow button. If you select several fields, you can move them at the same time. If you select a group then the entire group will be removed.
In addition to the buttons for moving the fields from one list to another, there is the Duplicate button between the two lists. You can use this button in case you wish to display one field several times at various places in the record window. After pressing the Duplicate button, a copy of the field selected in the left list is created, being thus listed two times. The new field is inserted into the group where the original field was. It is also possible to duplicate an entire group at once. When duplicating an item, the height, name, description, and display options are copied as well.
The left list further enables you to specify where exactly the record window will display the individual fields you selected to be displayed.
The individual fields can be organized in groups of eight different types:
- Tabs—fields grouped in tabs will be presented in separate tabs in the record window in such a way that you will only be able to see the content of a single branch (one tab) of the group. As a rule, tabs are the highest form of grouping, it is, however, possible to create further sub-tabs within a single tab.
- Column—fields grouped in a column will be displayed on top of one another in the record window.
- Row—fields grouped in a row will be displayed next to one another in the record window.
- Sections—sections are displayed under one another with a prominent delimiter and they can be hidden separately. Hiding of sections also applies to printing and is shared among the individual records.
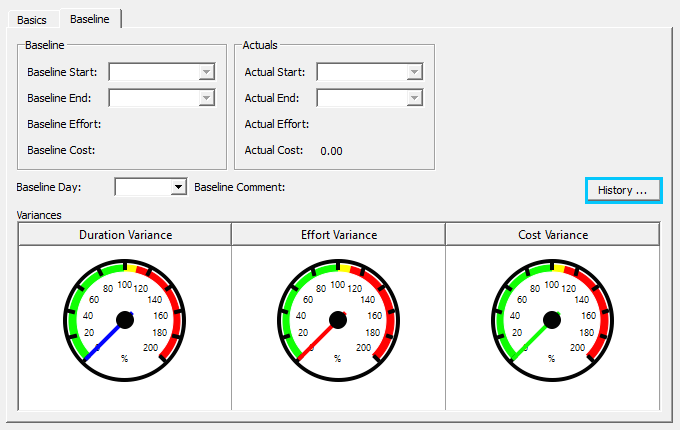
- Sub-window—when displayed, this type of group will be replaced with a
button; pressing the button will display the group in a separate window.
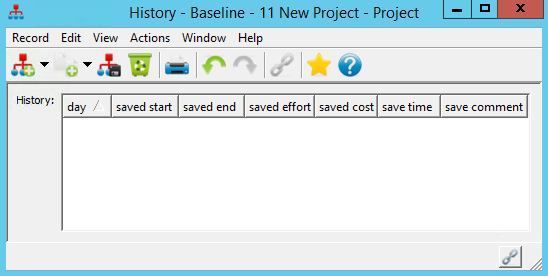
The History button in the Baseline plan tab of the project window can
serve as an example here.
After clicking the History button, the following window appears.
- The shared time line—this type of group links several reports to the time line to guarantee they always show the same period of time.
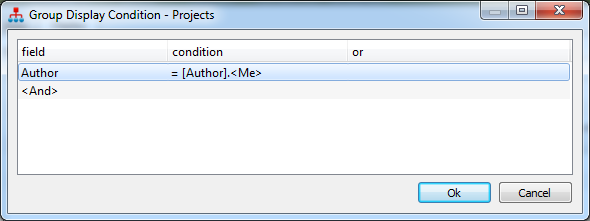
- Display if…—this type of group is used to hide a group of items automatically
unless a condition is met. After selecting this type a window pops up where you
can define the conditions.
You define the separate conditions in a similar way as when defining report filters. First select the field which should affect the way the group is displayed and then specify the value for which the condition applies. Any number of conditions can be defined while the conditions might be applicable simultaneously or independently. You cannot modify the conditions later on; it is necessary to enter them again if need be.
- Variables—This grouping type makes it possible to display various fields
depending on the value stored in another record field of the logical or picklist
type. The purpose of this group is to hide fields which do not make sense in a
given context.
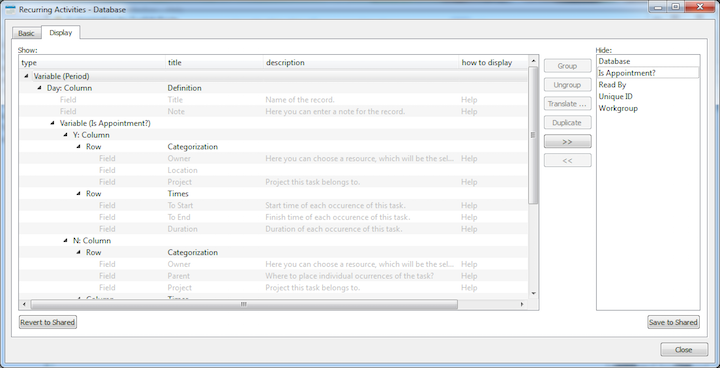
When you want to make sure that some fields are shown only if a specific value is selected in another field, join the relevant fields in a Variables type group. Depending on the selected logical or picklist field defining the variables, nodes will be created within the Variables group, each of them representing one variable. Under each alternative the fields can be organized always in a different way, some fields can even be hidden.
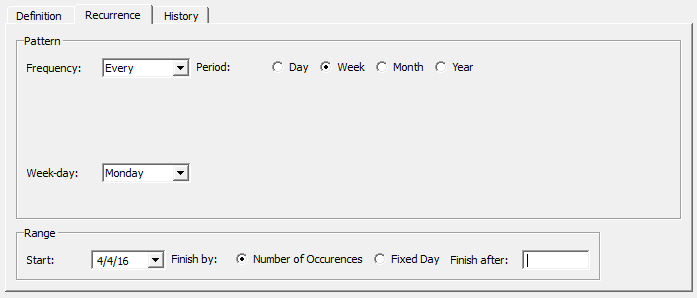
As an example of the Variables type grouping, we take the Period field, which is used in a record in the Recurrent Activities database. Under the default arrangement, the Period field, which is of the Picklist type, is displayed in the Recurrence tab. The individual options available for selection in this field are shown as Variables group nodes—Day, Week, Month, Year. Each of these options defines what other fields should be displayed and what their layout should be. For instance, when the option of Day is selected in a Recurrent Task record then the Pattern column will only display a row containing the Frequency and Period fields. When selecting the option of Week, however, the Pattern column will include not only the row with Frequency and Period fields but also the Day of Week field—see the pictures below.

After including a field in a group the group is expanded automatically.
The above mentioned field groups can be combined arbitrarily. This means that two or more fields can be grouped in a column, for example, and the entire column can be displayed in a tab.
Use the Group button to group fields together. The button is enabled as soon as you select at least one field. Pressing the button will create a group containing the selected fields.
You can easily move individual fields and subgroups from one group to another using drag-and-drop.
The groups themselves enable you to set the following characteristics directly in the left list:
- Type—specifies whether the group should be presented as a tab, column, row or whether variables will be applied
- Title—the name of the group as it will be displayed in the record window; in case of a subgroup in a Tabs group, the title will be displayed as the tab label; in case of Rows and Columns, a separator with the specified title and a horizontal line will be displayed Fields and reports show their name in gray as it is not possible to modify it here—it is entered in the definition window of the field and report, respectively.
- Description—groups enable you to enter help text here to be displayed when the mouse hovers over the group name or directly in the record window. Fields and reports show their description in gray as it is not possible to modify it here—it is entered in the definition window of the field and report, respectively.
- Display Options—the value defines the way description is displayed. If Help is selected then the description is displayed in the standard way after the mouse hovers on the group name. If the In Window option is set then the description is displayed in a window but it is not printed out.
- Select all the ten fields you want to display in the tab and press the Group button.
- Select the newly created group and choose the option Tabs as its Type; you may also enter the Title and Description.
- Select the five fields you want to display in one column within the tab and press the Group button.
- Select the newly created group and choose the option Column as its Type; you may also enter the Title and Description.
- Repeat steps 3 and 4 for the remaining five fields in the next column.
The record window enables you to display embedded reports. Only one setting of the report can be modified—Height. The height of an embedded report is the number of displayed lines. If the height of a report is specified, the number of displayed lines will always be fixed. If no height of the report is specified, the number of lines will be set automatically by the system.
If you unintentionally grouped fields you do not want to display in one group, select the group and press the Ungroup button. The group will be split into individual fields again.
Sharing arrangement modifications
If you are a workgroup administrator, you will find the Save to shared appearance button in the Display tab of the record display settings window, which enables you to share your modifications of the record window settings with other members of your workgroup.
The Display tab provides to all users the Reset shared appearance button, which enables them to cancel all applied record appearance settings including customization of all embedded reports and to return to the shared appearance version.
60 days overview of all dates, capacities, inputs and outputs about each project and completely free.
All rights reserved, Created by eBRÁNA Privacy statement